LunarLincolnLunarLincolnLunarLincolnLunarLincoln
  • Home
  • Process
  • Services
  • Work
  • Writing
  • About
  • Contact
  • Home
  • Process
  • Services
  • Work
  • Writing
  • About
  • Contact
Aug
01

Adventures in ARKit

  • Posted By : Logan Bennett/
  • 0 comments /
  • Under : Coding

Recently, at WWDC, Apple announced their venture into the world of augmented reality. If you’re wondering what exactly augmented reality, or “AR” is, it’s similar to virtual reality but instead of creating a completely virtual world for a user to experience, AR takes the real world, as captured by your camera, and places virtual elements into it – a la Snapchat face filters or Pokemon GO.

Apple supports AR in their latest phones with a new framework known as ARKit. This framework will allow developers to create some intriguing experiences through either SceneKit (which uses 3D models), SpriteKit (which uses 2D sprites), or Metal (which allows for custom rendering).

Building our first ARKit app

We at LunarLincoln thought this would be a great opportunity to explore the possibilities of AR. However, before we could do that we had to have the right tools which meant we had to upgrade to the new Xcode 9 beta and have a device running iOS 11 with at least an A9 chip which comes in the iPhone 6S and up.

Once we knew we wanted to do something with ARKit we needed to brainstorm some ideas. What would be a cool thing to throw into the real world, and what are the limitations of the software? A lot of time was spent scrolling through MadeWithARKit to see how people were using it.

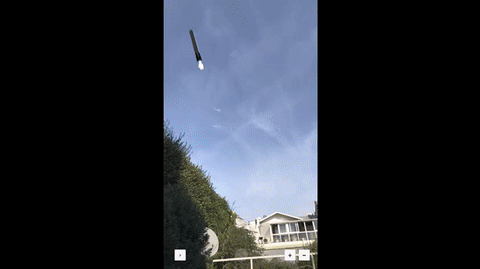
The primary application of ARKit early on was creating interesting experiences such as showing a virtual rocket land on your pool, or a robot dancing in your living room. The other side of it came in the form of practical tools such as a virtual tape measure, or being able to place furniture in a room to see if it would look good or fit.

To get a feel for ARKit, our app originally started as an app where you could tap on the ground and a 3D model of some sort would appear. This was a nice idea and gave us a feel for the logic and programming behind ARKit, but it was boring.

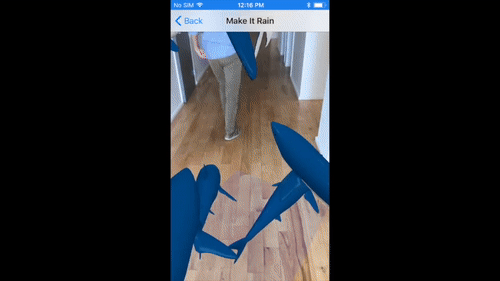
The idea was presented to make an item rain from the sky. What if we applied the same logic where we tapped on the screen and something appeared, but instead of some boring 3D model, it was a rain cloud that showered money? Yaaaaaas.

The Make it Rain concept

We would use SceneKit and ARKit together to create a cloud wherever, and then let it rain money that would then pile up on the ground.

To get this app working the way we wanted we had to read quite a bit about one of the staples of ARKit: plane detection. ARKit uses feature points and plane anchors to find surfaces and mark them in 3D space. Once ARKit has gotten us this information, we can use that position to simulate the ground by placing a physics body there so that as the objects are falling from the cloud they will smack into the ground and stop. SceneKit physics controlled the falling and bouncing once objects hit the ground in addition to making a body dynamic with the appropriate category and collisionBitMasks filled out.

Looking at this app now, most of the learning and code came from SceneKit. ARKit, itself, was fairly easy to use. The worldtracking that fixes an object in space as you move around it is just one line of code (!!!). So ARKit gave us the ability to place objects into the world and realistic positions, but the bulk of the development behind this went into giving objects physics, making sure they collided, and that they were in the right position.

Final result?

https://lunarlincoln.com/wp-content/uploads/2017/08/LoganMoney.mp4

So what’s the catch?

Working with ARKit presented several new hurdles to deal with. Debugging and testing with this app definitely felt strange. You frequently had to look up at the ceiling or back up and walk in a giant circle just to find where in space you have placed your 3D model. Getting sizes and perspectives correct was a challenge. A model might appear way up in the sky because at it current scale because it is the size of a cruise ship, but looking at it from your current perspective it looks to be the size of a car.

Another issue to wrap your head around is that the camera is the origin. If you decide to place something in space using fixed coordinates it will be relative to where you are holding your camera. Make it Rain had an invisible plane one meter down from the camera to catch anything that fell off of the edge of the floor plane and remove it from the scene. When I was testing the app sitting down, the raining objects were hitting the ground and piling up, but when I stood up, the invisible plane would rise above the floor’s plane and make the objects disappear before they touched the ground. This was a weird one that definitely tripped us up.

Beyond weird 3D space issues, there was the issue of finding good 3D models to use in the project. Finding free models that are in a format compatible with SceneKit, available for personal use, and that don’t look like crap is pretty difficult. SceneKit relies on Collada or .Dae files which aren’t particularly common. There were a few good sites out in the interwebs but Turbosquid was probably the best for finding models. That said, many ARKit developers dip into Unity for their models.

All in all this was an exciting project to work on and put out there. It is always enjoyable to explore new software. Especially one that lends itself to creating interesting experiences such as ARKit does. The current version not only rains money, but now has the exciting additions of sharks and stars.

We have a bit more polishing to do before public release alongside iOS 11 this fall, but we’ll be sure to make it available to everyone then. For now you can learn more about coding with ARKit here or here.


Jun
27

4H Pedometer Party

  • Posted By : Logan Bennett/
  • 0 comments /
  • Under : Coding

We recently partnered with the 4H Grow program and it’s coordinator, Andy Lantz to show their summer campers how mobile development works.  Andy informed us that the kids had been wearing pedometers everyday for the past week and were recording their steps in their notebooks. Our mission was to figure out a way to take this data, and use it for a mobile project that would be interactive, educational, and fun.

First we had to come up with an app concept for the pedometer data. The idea was presented that we could take all of the steps of an individual with their height and calculate how long it would take for somebody to travel to travel to various places. Now, where would it be interesting to walk to?… Why not the Moon or Disneyworld?


We have the idea. What comes next?

Prior to building code we needed a plan and all plans start with drawings (also known as wireframes in the mobile app business). They were just some rough sketches outlining where all the labels would be, what they would say, where buttons would take you, etc, but they got the job done.

After some review and finishing touches the pencil and paper prototypes were handed off to Jennifer, our UI designer, to be given style and design that can serve as a road map for building the app in Xcode. For this project we decided to use stock elements that resulted in simple code. This would help get the app done in a short timeline and make it easier to explain.

The final UI looked something like this:


After looks, then comes code

We then built the UI in Xcode storyboards. While the surface looked good and matched the designs, there wasn’t any logic hooked up to it yet.

The next task was to think about the math behind the app. We needed to take average steps for the week alongside a user’s height and turn that into a distance traveled per day. We would then take that distance traveled per day and apply it  to the various locations we had selected.

To get the distance a student would be traveling each step we did some quick Googling and came up with the number .414. This number is the fraction of your height that roughly equates to the length of your stride.


App Looks, App Calculates, App is Tidied for Play

Once the UI and math had melded together to achieve the desired result, it came time to think more about the code demo. We needed to review and look at the code in an approachable manner. Using a Swift Playground as a teaching tool seemed like an excellent solution. By putting some of the logic into a Swift Playground it would be much easier to show the students what exactly happening to their steps from when they first enter them into the app to when they get displayed at the end.

A playground is also great for sharing code with the students. All they need is an iPad and to download the Swift Playgrounds app. We created a google doc setup with the source code for the playground that anyone can copy and paste into the app to manipulate or play with.

On a sidenote: Swift Playgrounds are great resources for testing out code ideas and learning code in a simple manner. Check out these other Swift Playground projects here.


Demo Day

After the app and Playground were complete and ready to go it was time for the students to come to the office, learn about LunarLincoln, test out the app, and see how long it would take them to walk to the Moon.

After the students had gotten their data for the Moon we listed them out on the whiteboard and compared results looking for any interesting insights. Would shorter students take longer? What about students who walked more than others? In general we discovered that walking times averaged around 400 years for the campers!


Interesting Discoveries in QA

The app for the most part worked out great, all of the students were able to get their desired results, but afterwards they wanted to experiment with some fictional data. They began to either put in one step a day which resulted in it taking an astronomically long time to get to the Moon (pun intended) and the result field would overflow, or they would put in nines until their fingers got tired or the app crashed and again the result field would have issues. It was usually the latter.

Problems with this “creative” QA experience? The app had issues with integer overflows because we had assumed they wouldn’t walk more than 2,147,483,647 steps a day and thus: crashing. A great learning experience for both our intern, Logan, who built the app as well as the kids for their creative experiments.


Recap and Materials

The experience was challenging for our project lead – Intern Logan, and was educational and fun for the students. They were able to see what some of their favorite apps might look like under the hood, and see what goes into building a mobile app from the ground up. To go through the full presentation and playground: visit Lunarlincoln.com/4H


Recent Posts
  • Celebrating 10 Years
  • Copious Communication
  • Initial Questions for a New Mobile App Project
  • Gif TV: A LunarLincoln Product
  • Onboarding other peoples code
  • What’s in a name?
  • Don’t build it all. Picking a Platform.
  • Talk to your Users
  • Design for Fat Fingers
  • A new look
Archives
  • August 2023
  • May 2021
  • September 2020
  • November 2019
  • October 2019
  • June 2019
  • April 2019
  • February 2019
  • January 2019
  • October 2018
  • August 2018
  • June 2018
  • April 2018
  • January 2018
  • October 2017
  • August 2017
  • June 2017
  • February 2017
  • January 2017
  • September 2016
  • July 2016
  • April 2016
  • March 2016
  • February 2016
  • October 2015
  • September 2015
  • July 2015
  • May 2015
  • February 2015
  • December 2014
  • November 2014
  • September 2014
  • May 2014
  • April 2014
  • January 2014
  • December 2013
  • September 2013
  • August 2013
  • July 2013
  • June 2013
  • December 2010
Categories
  • Agency
  • App Advice
  • Branding
  • Business
  • Business
  • CaseCollage
  • Coding
  • Design
  • Design
  • NSVille
  • Uncategorized
  • Web Design
Copyright LunarLincoln 2025. All Rights Reserved